Chapter 20 — The employee directory
The directory is the front door to every record in Part 4. It is also the list people outside HR ask for most: finance wants a headcount by department, a manager wants their team on paper, an auditor wants the roster as of a date. This short chapter covers finding a person in it, reading what the list tells you at a glance, and taking a copy out as a spreadsheet or a printout without losing anyone on the way.
What this chapter covers
- 20.1 Finding people: search, filters and the list itself
- 20.2 Export CSV and Print: what each copy contains
- 20.3 Grid, photos and acting on a selection
- 20.4 The org chart
The concept
A directory answers two questions: who is here, and who was here when. The first is served by search and filters; the second is why exports exist. Every copy you hand out is a snapshot that stops being true the next time someone joins or leaves, so a good directory makes it obvious what a copy covers (which filter, which date) and keeps the sensitive fields out of the copy by default. An export that carries identity numbers and home addresses into a spreadsheet on a shared drive is the most common way HR data leaks, and it is almost never needed: the people who ask for a list want names, codes, teams and titles.
The other discipline is to search the record, not your memory of it. A directory indexed on first name, last name, code and email finds the person whether you remember "Okoro", "NWL-0051" or the address they write from, and it finds them under the status they are actually in. Filtering by status is also how you audit hygiene: records still New weeks after joining, people marked On Leave who came back, leavers never separated.
How Operentra handles it
- Where it lives. Employees › All Employees, at
/admin/employees. The sidebar entry needsemployees.view_all, which the Super Admin, HR Manager, HR Officer and Accountant roles hold. Department heads do not see the directory; their team is in the portal (Chapter 90). The command palette (Chapter 5) reaches it under "staff list", "directory" or "roster". - One list, filtered seven ways. A search box, department and status drop-downs, and under More filters designation, branch, employment type and photo, all combined. Export and Print always take the whole filtered list, however many pages it runs to, in the order on screen.
- Newest first, unless you sort. The list starts with the most recently added records, 24 to a page; Sort and the column headers change the order.
- A list or a wall of photos. List and Grid show the same people; the grid makes missing photos obvious.
- The view is in the address. Filters, sort, page and layout are all part of the page address, so the back button and a shared link bring back exactly the same view.
- The list is also where bulk activation lives. The amber pending-activation banner and the blue activation bar were covered in Chapter 18 and are not repeated here.
- Copies carry no sensitive fields. Both the CSV and the printout hold the code, name, department, designation, join date and status, and nothing else.
Walkthrough
20.1 Finding people: search, filters and the list itself
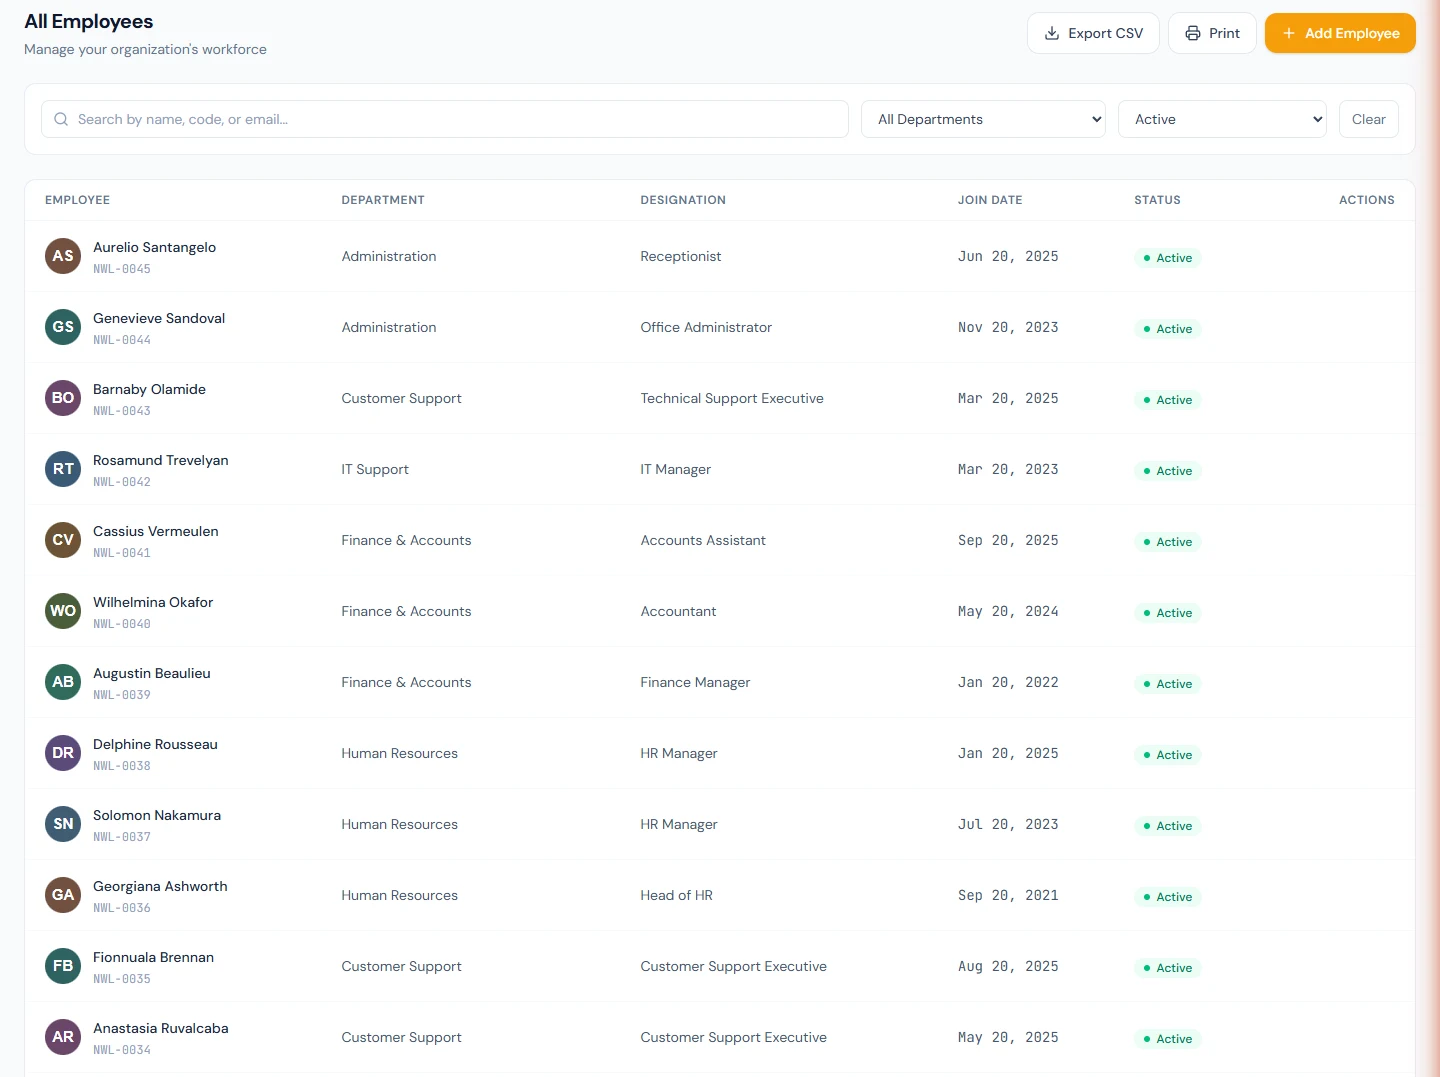
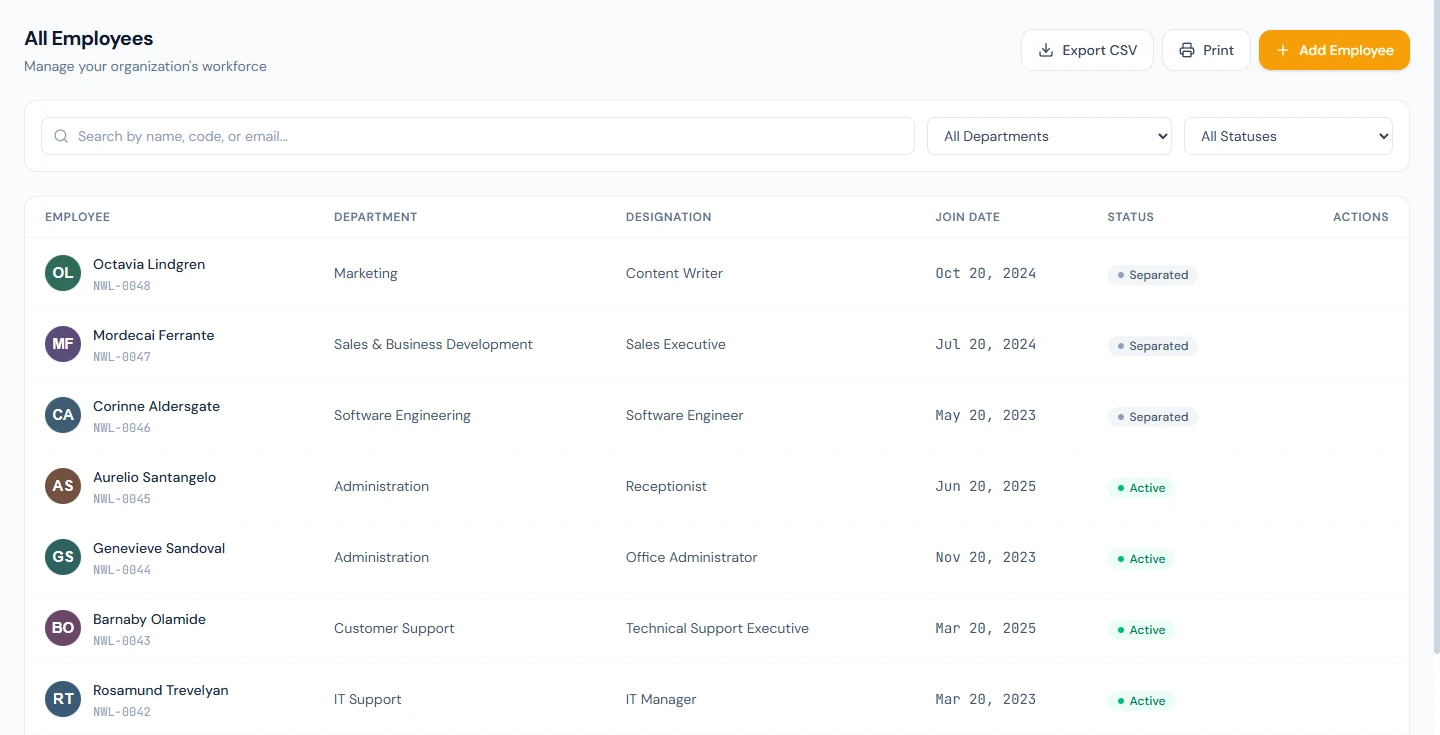
The page is headed All Employees, "Manage your organization's workforce", with Add Employee on the right. Next to the filters sit Sort, the List | Grid switch and the ⋯ (More actions) menu, which holds Export CSV, Print and, for people who can edit records, Upload photos. Export and Print are greyed out while the current filter matches nobody.
Below the header, when any record is still pending activation and you are not already looking at them, sits the amber banner from Chapter 18. Then the filter card.
Search matches as you type, a third of a second after you stop. Each word you type has to appear somewhere in the person's first name, last name, employee code, identity number, personal email or work email, and matching ignores case. So all of these find Harriet Okoro:
| You type | Why it matches |
|---|---|
| okoro | the last name |
| Harriet Okoro | each word matches a name field |
| NWL-005 | the start of the code, together with NWL-0050 and NWL-0052 to NWL-0055 |
| harriet.okoro@ | the personal email |
What it does not search: department and designation names (use the drop-downs), phone numbers, and addresses. The small ✕ in the box clears it.
All Departments narrows to one department; All Statuses narrows to one of the eight statuses, including New (Pending Activation) and Separated. More filters opens four more, with a badge counting the ones in use: Designation, Branch, Employment type and Photo (Any, Has a photo or Missing photo). Every filter in use shows as a chip under the bar; its ✕ removes that one, and Clear all removes them all while leaving the search text alone. Changing any filter returns you to page one.
Sort offers Recently added (the default), Name A–Z and Z–A, Employee code, and Joined: newest first or oldest first. In the list, the Name, Code, Department and Join Date headers sort too; clicking one again turns the order round.
In List, each row holds the person's photo or initials with the name and, beneath it, the designation and code (and the work email on a wide screen); then the department and branch (shown as the screen gets wider), the join date (written short, 05 Jan 2026) and the status as a coloured badge. The whole row opens the profile. With a mouse on a wide screen the View, Edit and Delete icons appear when the pointer is over the row; otherwise a ⋯ menu at the end of the row holds them. View and Edit open the profile and Edit Employee from Chapter 19. Delete asks "Delete employee?" and does what the profile's Delete does, including closing the person's login; the list refreshes in place.
Under the list, when the filter runs past 24 people, a footer reads "Showing 1 to 24 of 50 results" with page controls and a Rows choice of 24, 48 or 96. The count is the one to quote when someone asks how many people match.
An empty result shows "No employees found" with Clear Filters, which clears the search too; with no records at all, "No employees yet".
Example. Northwind's support desk grew by four in Chapter 17. To see the whole desk, HR sets All Departments to Customer Support and leaves the status open: the four new agents are at the top, because they are the newest records, with the agents who were already there below them. To check that nobody on the desk is still pending, HR sets the status to New (Pending Activation) while keeping the department: an empty list is the answer wanted. Clear all resets both.
20.2 Export CSV and Print: what each copy contains
Both work on the current filter and walk through every page of it, in the current sort order, so a list of 140 people yields 140 rows, not the 24 on screen.
Export CSV downloads a file named employees.csv with seven columns: Code, First Name, Last Name, Department, Designation, Join Date and Status. Three things to know about it. (A count of people by department at a date, or the joiners and leavers of a quarter, is a question for People Analytics (Chapter 91A), not for this export.)
- It opens cleanly in Excel, Numbers and Google Sheets; the file is written so that accented names survive.
- Dates and statuses are written the way the screen shows them, in the language you are using: "05 Jan 2026" and "On Leave", not a machine date and a code. It is a people list for humans, not an import file; the import format is the sample from Chapter 17.
- It carries no identity numbers, emails, phones, addresses or bank details. If a request needs those, it needs a conversation about why, not a wider export.
Print hands the page to your browser's print dialog, and what prints is not the screen. It is a register headed with your company logo and name, the title Employee Directory, and the count of people in the filter, over a plain table of six columns: Employee, Code, Department, Designation, Join Date and Status. A footer line records the date it was generated. In the print dialog, choose landscape for the table to breathe, and Save as PDF when the copy is going by email rather than to paper.
Example. Finance asks Northwind for the active headcount by department at the end of the quarter. HR sets All Statuses to Active, leaves the department open, clicks Export CSV, and sends the file: one row per active person, with a Department column finance can pivot on. For the team list the head of Customer Support pins up, HR sets that department and clicks Print; the register carries the company name and the date it was generated, so next quarter's copy is recognisably newer.
20.3 Grid, photos and acting on a selection
Grid shows a card per person: the photo in portrait, a status dot, the name, designation, and department and code. Hovering offers View and Edit (the grid has no Delete). A card with no photo carries an Add photo button, which opens the crop dialog of Chapter 19. Set Photo: Missing photo in More filters and work down the grid until it is empty. The directory remembers the layout you used last, in your browser.
⋯ › Upload photos handles many at once. Name each file after the
employee's code (NWL-0042.jpg), click Choose photos or Choose a
folder, and the dialog shows how many files matched an employee and
how many didn't before you upload. Each photo is cropped to the 3:4
portrait automatically, and a results table lists each file as updated
or not, with the reason. Adjust any crop later from the profile.
Acting on a selection. With Brand Studio unlocked, people who can issue ID cards see tick boxes on the current employees (New, Active and On Leave; others can't be ticked). Ticks survive paging and reset when the filters or search change; in Grid, "Select everyone on this page" helps. A bar at the bottom reads "Selected: N" with Clear selection, Issue ID cards and Order visiting cards, up to 100 people at a time. Chapter 81 covers both actions.
20.4 The org chart
⋯ › Org Chart (also under Employees in the sidebar, and a button on Company Setup › Departments) draws the reporting tree: everyone still employed as a card with photo, name, designation and department, and a line down to each person whose Reporting Manager they are. Someone whose status is On Leave or Suspended keeps their card, tagged with the status, and their reports stay under it. Nobody draws the chart; it is the Reporting Manager field of Chapter 16 read for the whole workspace, so a wrong line is fixed on Edit Employee, not here. People with no manager, or whose manager has left, sit at the top; a larger team is drawn to the left of a smaller one. Northwind's chart has one root, its chief executive, and six levels.
With employees.view_all the chart is the whole workspace. A holder of
employees.view_team alone, such as a Department Head, opens the same
page and sees their own reporting line: their card and everyone below
it (9A.6).
A card with reports carries a chip reading how many people are below it at any depth; click it to fold or unfold the team. The small ⌖ beside it focuses the chart on that person, which is how a manager's own tree is read without the rest; the chip at the top clears it. The department drop-down keeps only one department's people: a manager outside it then becomes a top card, since the line to them cannot be drawn. Zoom goes from 40% to 160% and the canvas scrolls both ways.
Export PNG downloads the chart as a picture, with the same department and focus as the screen. It is rendered on the server with initials in place of photos, so it is safe to paste into a deck or an intranet page. Like the directory's exports, nobody is told it was made, and it is a copy of personal data to be stored and discarded with the same care as a printout.
What happens next
- Nothing changes in Operentra when you search, filter, export or print. The copy is yours, and so is its protection: store it where the people on it would expect, and delete it when the request is served.
- A Delete from the row is the delete of Chapter 19: the record is hidden everywhere and the person's login is closed.
What the employee sees
- Employees do not see the directory or the org chart. A manager sees their own team in the portal (Chapter 90).
- Nobody is told that a list was exported or printed.
Common mistakes
- Exporting with a filter still set. The file quietly holds only the filtered people. Read the count in the footer, or clear the filters, before you export.
- Expecting the CSV to re-import. It is a readable list; dates and statuses are words. The import sample in Chapter 17 is the file that goes back in.
- Reading the order as alphabetical. The directory starts with the most recently added. Pick Name A–Z under Sort, and the export follows the same order.
- Searching for a department or a title. The search box reads names, codes, identity numbers and emails. Departments and designations have their own filters.
- Deleting from the row by accident. Delete is the red icon on the right of a row (or the last item in its ⋯ menu). The confirmation is the only guard, and the login closes with the record.
- Treating the printout as an emergency list. It has no phone numbers or emergency contacts; those live on each profile and in the Verifications screen (Chapter 23).
- Quoting the page count as the headcount. "Showing 1 to 24 of 50" means 50. The dashboard (Chapter 7) counts active employees only.
- Trying to drag a card on the org chart. The chart is read from each profile's Reporting Manager; move the person there, or with a transfer (Chapter 24), and the chart follows.
Practice
Work in your own trial workspace.
- Type the last two digits of a code into the search and read which records match and why.
- Type a person's full name, first and last, and confirm they are found. Type their email address and confirm the same.
- Set a department filter and a status filter together. Note the count in the footer, then click Clear all and note what it did and did not reset.
- With a filter set, click Export CSV. Open the file and count the rows against the footer.
- Click Print, choose landscape, and save a PDF. Read the header and the footer line.
- Filter the status to New (Pending Activation) and decide whether anyone listed should still be there.
- Switch to Grid, set Photo: Missing photo, and add a photo to one card. Copy the page address, open it in a new tab, and confirm the same view comes back.
Quiz
1. You export the directory while the status filter is set to Active. Who is in the file?
Only the active employees: Export CSV and Print always take the current filter, every page of it. Clear the filters first for the whole workspace.
2. Which six fields appear on the printed register, and which personal fields are deliberately absent?
Employee, Code, Department, Designation, Join Date and Status. Identity numbers, emails, phones, addresses and bank details are not printed or exported.
3. Typing "Harriet Okoro" finds Harriet, but typing "Software Engineering" finds nobody. Why?
Search matches each word against first name, last name, code, identity number and the two email addresses. Department names are not searched; the department drop-down filters by them.
4. The list shows your newest hire at the top rather than at the letter of their surname. Is something wrong?
No. The directory starts with the most recently added records. Choose Name A–Z under Sort, or click the Name header; Export CSV and Print then follow that order too.
5. Can the CSV you exported be used to import those people into another workspace?
Not as it is. It carries display dates and status words and only seven columns. The bulk import of Chapter 17 expects its own sample's columns and dates written as YYYY-MM-DD.
6. A team lead appears at the top of the org chart beside the managing director. What has happened, and where is it fixed?
Their Reporting Manager is empty, or points at someone who has left or is outside the department you filtered to. The chart only reads that field: set it on Edit Employee (or by a transfer) and the card drops into place.