Profile & security
Two different screens hold "your details", and the distinction matters:
- My Profile in the portal (
/portal/profile) — the company's approved copy that payroll, letters, and verifications run on. Read-only. - My Account (
/profile, from your avatar menu) — the profile you own, which travels with you across every workspace you belong to. Fully editable.
Your profile in the portal: the employer's copy
My Profile shows the personal details your employer has on record for you. A banner at the top explains that updates are made from My Account, with an Edit in My Account button that takes you there. Changes you submit appear here once HR approves them.
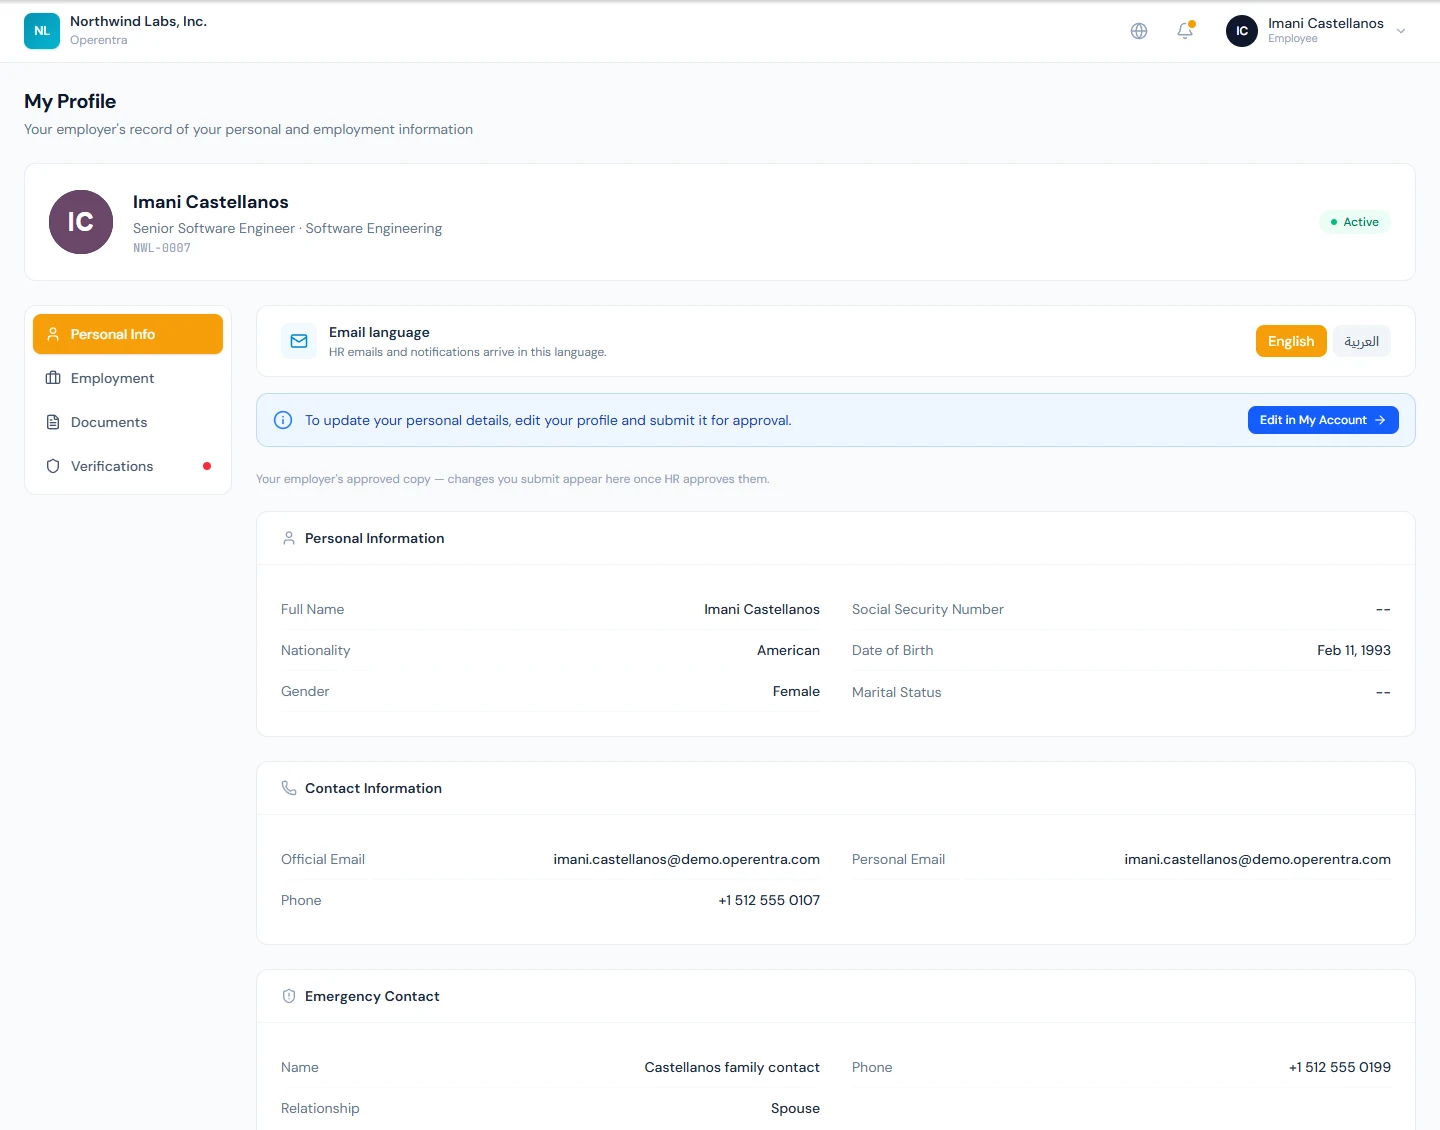
The two things you can change here are your photo and your Email language — the compact selector at the top of the profile tab controls which language HR emails and notifications arrive in.
Your photo
Click your photo (or your initials) at the top of My Profile, or Add a photo / Change photo under it. Choose a picture, or on a phone take one with the front camera. Then drag and zoom it so your face sits inside the dashed oval, and use Rotate if it is on its side. The previews beside it show how it will look in lists and on the directory card.
- Use a plain, light background, face the camera, and leave sunglasses and hats off.
- JPG, PNG, WebP or GIF, up to 10 MB and 70 megapixels. iPhone HEIC photos are not accepted: pick the photo from the Photos app (it is converted for you) or save it as a JPG first.
What happens next depends on your company:
- HR reviews new photos (the usual setting): the button reads Send to HR for review, and Your new photo is waiting for HR approval shows under your photo until they decide. You can Cancel it while it waits, and you get an email when HR decides. If they don't approve it, their note appears under your photo with Upload another photo.
- No review: the new photo replaces the old one at once.
- Only HR changes photos: you see To change your photo, ask HR. instead of the buttons.
Your photo also appears next to your name in the top bar.
The page keeps its other tabs — your employment details, Documents, and Verifications — for uploading documents and completing verification steps.
My Account: the profile you own
This is your personal master record: name, identity numbers (plus father's name where your country records it), date of birth, marital status, personal email, phone, emergency contact, your addresses, and your primary bank account. You can edit all of it freely, at any time — nothing you change here reaches any employer automatically.
Sharing changes with your employers
When your profile differs from what an employer has on record, a Share with your employers card appears, listing each company where your changes are not yet shared. To send your changes:
- Tick the companies you want to update — it is your choice, per company.
- Click submit. Each selected company's HR receives your snapshot for review.
What happens next:
- Approved — the company copies your submitted details into its employee record. If your phone, emergency contact, or an address changed, the company may ask you to verify them again.
- Returned — HR sends it back, optionally with a note explaining what to fix. Your profile keeps your edits; correct them and share again.
- On your record at once — some companies let contact details or an address through without a review. There the message says your record is updated, and there is nothing to wait for. A changed phone, emergency contact or address may still need verifying again. Your name, identity number, date of birth and bank account are reviewed everywhere.
Where your company reviews these changes at its HR Desk, what you sent also appears under Requests, where you can follow it, answer a question from HR, or withdraw it.
Either way you are notified by email. Companies whose copy already matches your profile are not offered, so you can never spam HR with no-op reviews.
If you were invited to the portal as a new hire, your employer may be waiting for your first profile submission — HR did not enter your personal details for you. Complete your profile and share it with them; the card highlights employers still waiting.
Skills and résumé
If your employer has skills management switched on, My Profile has a Skills & résumé tab. It shows what your employer's record says you can do, at what level, how that compares with what your role requires, and your résumé. You cannot edit the record directly:
- Propose skills picks each skill from your employer's library with the level you hold and, where it applies, when you were certified and when that lapses. Propose résumé entries adds experience, education, certifications and other entries. Each goes to HR for review; one proposal of each kind can wait at a time.
- Your proposals lists each one as waiting, approved or returned, with any note HR added. Approved items appear on the record marked self-reported.
- Thirty days before a certification on your record lapses, you are emailed and told in the bell; send the new certificate's date as a proposal once you have renewed it.
Employments
An account-wide history of every company where you hold or held an employee record — current and ended, with your designation, department, and joining/separation dates. Because these records belong to your account, they remain visible here even after an employment ends.
Email
The Email tab of My Account chooses which emails Operentra itself sends to your sign-in address: Getting-started tips, Product updates, and News and offers can each be switched off. Billing and account notices and Required notices (a change to the privacy policy or terms, a security matter, a change to the service) are always on while you have an account.
One choice covers every workspace you belong to, and the preferences link at the bottom of those emails opens the same settings. These choices don't affect the emails your employer's HR sends you through Operentra, such as payslips or leave decisions.
Where I work
Where I work, under Me in the portal, is where you tell your colleagues where to find you. It needs no setup on your side beyond what HR has already done: your employer keeps a list of places (its offices, Home, any client sites) and has set your default, the place you usually work from.
- Today is the big card at the top, coloured by the place, with a line saying why it reads what it does: Your usual place, From your weekly pattern or Set for this day. Change opens a picker of your employer's places for today. Choose a place, type a note if you want one ("at the client until 3pm"), and press Save. The place and the note are saved together; choosing a place only selects it, and nothing is saved until you press Save.
- The next seven days is one tile per day with the same picker a tap away, so Thursday's appointment is set on Monday. A day you set yourself is tinted and labelled Set for this day. Open it again to see its place and note and change either, or press Back to my usual place for this day to remove it.
- My usual week is your pattern: seven selects that read Same as default until you choose otherwise, and Save writes only the days that differ. Your default itself is HR's to set; if none is set yet the page says so and asks you to pick a place per day.
- Your team today is your department's picture for the day: one bar per place with the faces, then anyone on leave and anyone with nothing set. The portal dashboard carries the same card with your own place on top.
A day you are on approved leave shows to your team as On leave, whatever you set here. Where I work says where you work, not whether: time off is applied for on My Leaves.
Sign-in & Security
Your credentials — one set for every workspace you belong to:
- Change password — requires your current password. One password covers your whole account, so changing it signs you out on every other device, in every company you belong to. The device you changed it on stays signed in.
- Sign-in email — change the address you sign in with. Enter the new address and your current password; a confirmation link is emailed to the new address (valid for 60 minutes) and a heads-up goes to the old one. Nothing changes until you click the link — then every session is signed out and future sign-ins use the new address in every company at once.
If any company you're an active member of enforces the official email only sign-in policy, the email change is blocked with a clear message until you leave that company.
If you sign in with a company-owned address and are leaving the company, switch your sign-in email to a personal address during the offboarding grace period — otherwise your account goes dormant when the membership closes.
Kiosk PIN
Where a workspace clocks people in at a tablet, the Kiosk PIN card under this section holds the four-to-eight-digit PIN you type there. Set it, change it or remove it here; nobody else can read it, and HR can only reset it. Setting it again also lets you back in at once if a tablet locked you out after too many wrong tries. The card only appears while you have an employee profile in the current workspace.
Two-factor authentication
2FA adds a second sign-in step: after the password, you enter a 6-digit code from an authenticator app on your phone (Google Authenticator, Authy, 1Password, Microsoft Authenticator — anything TOTP-compatible). It protects your account, not one workspace: enroll once and the code step applies to all of your sign-ins.
To enable it:
- Open My Account → Sign-in & Security.
- On the Two-Factor Authentication card, click Enable two-factor authentication.
- Scan the QR code with your authenticator app (or type the setup key manually), then enter the 6-digit code the app shows.
- Save the recovery codes. They are shown exactly once — copy or download them and store them somewhere safe (a password manager is ideal).
Each recovery code signs you in once if you don't have your phone; the card shows how many you have left, and you can generate a fresh set at any time.
If you lose your authenticator and your recovery codes, ask a workspace administrator to reset your 2FA — you'll sign in with just your password and can re-enroll. After 5 wrong codes, the 2FA step locks for 15 minutes.
Some workspaces make 2FA mandatory. You'll be walked through setup at your next sign-in, and you can't disable it while you belong to a workspace that requires it.
Switching workspaces
If your account belongs to more than one company, click the company name in the top bar to switch between them — each company sees only its own data, and your role can differ in each.