Expense claims
The Expense claims module lets employees ask to be reimbursed for money they spent on the company's behalf — travel, meals, software, training, and so on. Each claim goes through a two-step review (the employee's reporting manager first, then HR/Finance), and once HR gives final approval the amount is added to the employee's next payroll automatically as a non-taxable reimbursement.
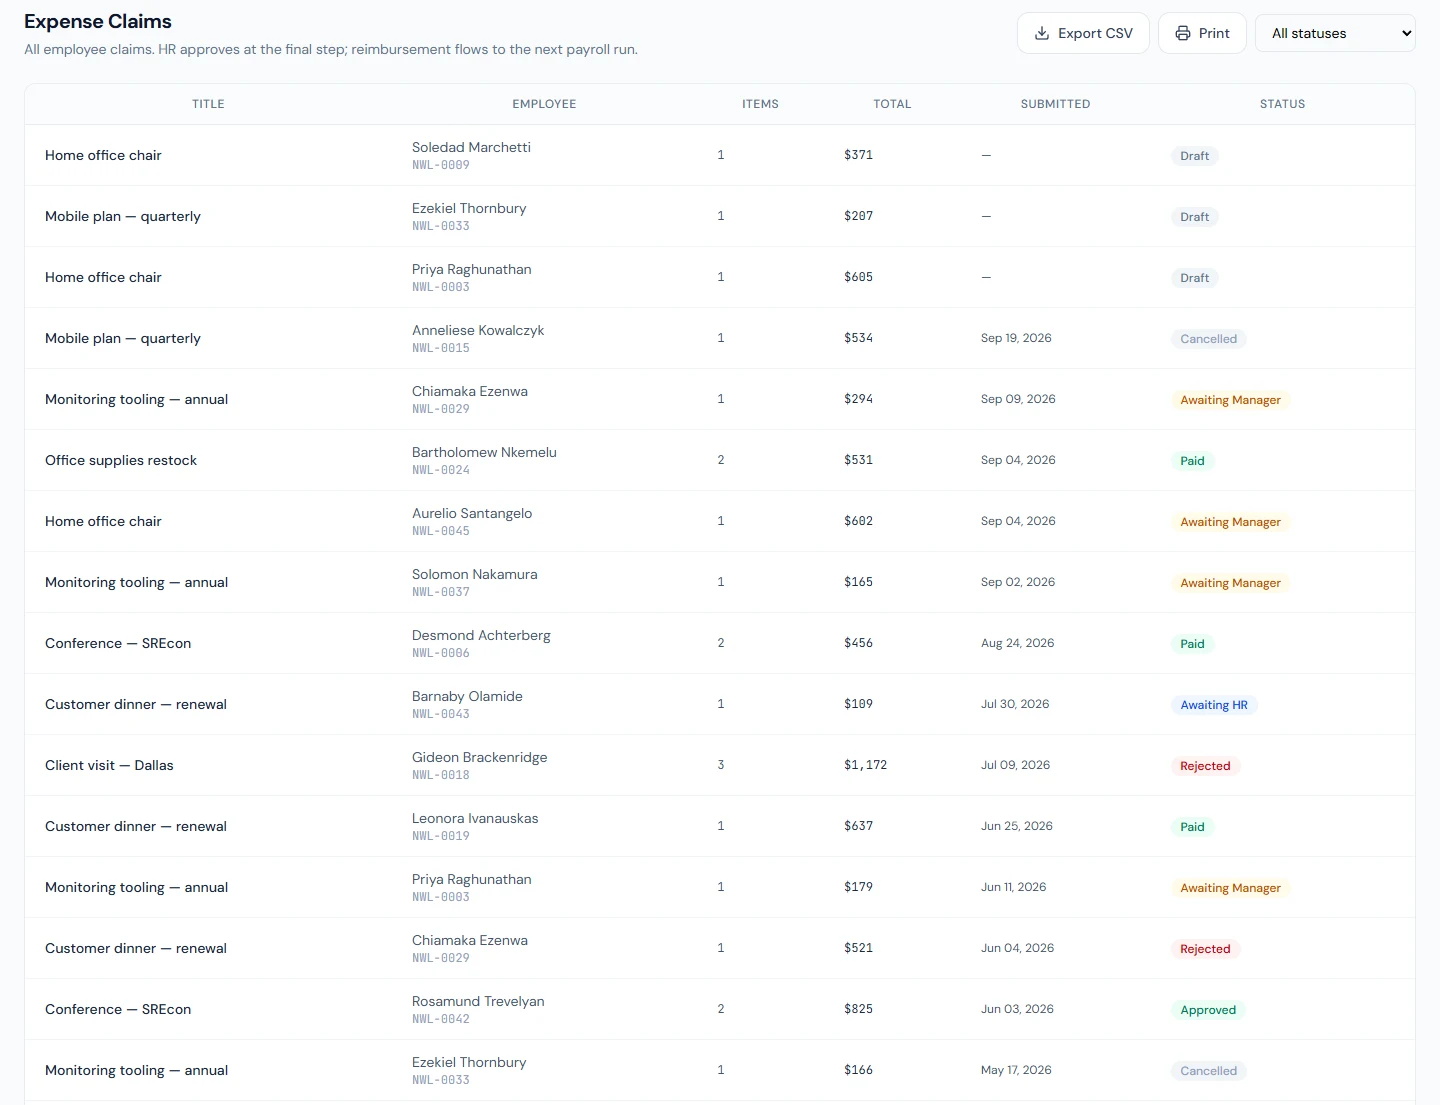
There are two sides to the module:
- Employees work in the portal under My Expenses and, if they manage a team, Team Expenses.
- HR / Finance and admins work in the admin area under Expense Claims and Expense Categories.
Who can do what
Access is controlled by four permissions. A role can hold any combination of them.
| Permission | Lets the holder… |
|---|---|
| Submit Own Expense Claims | Create, edit, submit, and cancel their own claims (the portal My Expenses pages). |
| Approve Team Expense Claims (Manager) | See and approve/reject claims from their direct reports (Team Expenses). |
| Final-Approve + Configure Expense Module (HR/Finance) | Give final HR approval, reject, and manage expense categories. |
| View All Expense Claims | See every claim in the workspace on the admin list. |
The claim lifecycle
A claim moves through these statuses. The label in brackets is what appears on screen.
| Status | Shown as | Meaning |
|---|---|---|
draft | Draft | Being written; only the owner can see and edit it. |
submitted | Awaiting Manager | Sent for approval; waiting on the reporting manager. |
manager_approved | Awaiting HR | Manager approved; waiting on HR/Finance. |
approved | Approved | HR approved; a payroll adjustment has been created. |
paid | Paid | The payroll run that reimbursed it has been locked or paid out. |
closed | Closed | HR approved and nothing was owed, because every item was paid on the company card. There is no payroll adjustment and nothing more happens to the claim. |
rejected | Rejected | Turned down by the manager or HR, with a reason. |
cancelled | Cancelled | Withdrawn by the employee. |
The normal path is:
draft → submitted → manager_approved → approved → paid
with two side exits — rejected (by a reviewer) and cancelled (by the employee). A claim paid entirely on the company card ends at closed instead of approved, since no payroll run will ever pay it.
HR/Finance can approve a claim directly from Awaiting Manager without waiting for the manager step — useful when the claimant has no reporting manager set, or when Finance handles approvals centrally.
The two steps are the claim's default approval flow: the reporting manager, provided their role holds Approve Team Expense Claims (Manager), then anyone holding the HR/Finance permission. A workspace can replace it with custom flows — claims over 50,000 → manager, Finance, then the CEO — and the chain a claim is on shows in the portal's Approvals inbox. See Approval flows. When a claimant has no reporting manager, or the manager's role does not hold that permission, the manager step is skipped and the claim waits on HR straight away. Someone who is both the claimant's manager and HR/Finance settles the claim in one action with HR's own approve or reject.
For employees: submitting a claim
Go to My Expenses (/portal/expenses) and select New Claim.
- Give the claim a Title (for example, "Chicago client trip — May 2026") and an optional Description.
- Add one or more line items. Each line item has:
- Category — pick from the list (required). A category may carry a policy; the form shows it as you type.
- Date — when the expense happened (required).
- Amount — must be greater than zero (required). The field is labelled with your workspace currency. On a per-unit category (mileage, per diem) you enter a Quantity instead and the amount is the category's rate times that quantity.
- Paid by — Me (reimburse) or Company card. A card item is recorded for the books and never reimbursed.
- Another currency — tick it for a receipt in a foreign currency, enter the three-letter code and the rate (one unit of that currency in the workspace currency). The item is stored in both.
- Description — optional note about what it was for.
- Justification — optional, unless the category requires one above a threshold.
- Receipt — optional. Select Upload receipt to attach an image or PDF. You can replace it later. Read receipt asks the workspace's AI provider to read it into the empty fields (see below).
- Use Add line for each additional expense. The running Total updates automatically as you type, with the split between what is owed to you and what went on the company card.
- Finish in one of two ways:
- Save draft keeps the claim private and editable so you can come back to it.
- Submit for approval sends it to your reporting manager (status becomes Awaiting Manager).
Attach a receipt to every line item where you can. Reviewers can open each receipt directly from the claim, which makes approval faster.
Editing, viewing, and cancelling
- A claim can only be edited while it is a Draft. Open it and select Edit to change the title, line items, or receipts. Once submitted it is locked from editing.
- You can Cancel a claim while it is a Draft, Awaiting Manager, or Awaiting HR. You cannot cancel a claim that has already been approved, paid or closed.
- Open any claim from My Expenses to see its line items, receipts, status, and — once approved — which payroll month it will be reimbursed in.
For managers: approving your team's claims
If you have the manager permission, Team Expenses (/portal/team-expenses) shows claims your direct reports have submitted and that are waiting on you (status Awaiting Manager).
For each claim you can:
- Expand View items to see the line items, amounts, and any attached receipts. Each line shows what it comes to in the workspace currency; a receipt in another currency also shows the amount as paid and the rate the claimant typed, a per-unit line its quantity and rate, and a company-card line is marked as such.
- Select Approve to pass it up to HR/Finance (status becomes Awaiting HR).
- Select Reject and enter a reason. The reason is shown to the employee.
Only the claimant's own reporting manager can approve or reject at this step, and only while the claim is still Submitted. Once you approve or reject, the claim leaves your queue; after that, only HR/Finance can turn it down.
For HR / Finance: final approval
The admin Expense Claims page (/admin/expenses) lists every claim in the workspace. You can:
- Filter by status using the dropdown.
- Export CSV or Print the current list.
- Select any row to open the claim detail.
On the claim detail page (/admin/expenses/:id), when a claim is Awaiting Manager or Awaiting HR you will see two actions:
- HR Approve — gives final approval. This is the step that triggers the payroll reimbursement (see below).
- Reject — turns the claim down; you must enter a reason, which the employee sees.
You cannot approve a claim whose total is zero, and you can't approve or reject your own claim while someone else with expense management access can decide it. In a workspace where you're the only one, you still can.
A claim is decided once. If two people act on the same claim at the same moment (two approvals, an approval and a rejection, or a decision and the employee's cancellation), the first one stands and the other is told the claim has already been decided. Nothing is written for the one that lost: no second payroll adjustment, no email.
What happens on HR approval
When you select HR Approve, the system does two things in a single step:
- Marks the claim Approved and records who approved it and when.
- Creates a payroll adjustment for the employee so the reimbursement is picked up by the next payroll run. The adjustment is for the claim's reimbursable amount: items paid with the company card are kept out.
A claim made of card items alone has nothing to reimburse. Approving it creates no adjustment and marks it Closed rather than Approved: the approval is recorded, the items appear on the company-card report, and the claim is finished. The confirmation you are asked for says so before you approve.
The payroll adjustment is created with these characteristics:
- It is an addition (money paid to the employee).
- It is non-taxable — reimbursements are not treated as taxable income.
- It is paid to the cent, even where Payroll Settings rounds pay to whole units.
- It is dated for the current month (in
YYYY-MMform), and its reason references the claim title.
The claim detail then shows a confirmation banner with the linked payroll adjustment and the month it belongs to. The employee sees the same information on their own claim ("Will be reimbursed in your … payroll"). Once that payroll run is locked or paid out, the claim shows as Paid, and the employee's note reads "Reimbursed in your … payroll".
HR approval is what puts money into payroll — there is no separate "pay" button. Review the line items and receipts before approving, because the reimbursement will flow into the payroll run for the month it was approved in.
Managing expense categories
Categories are the taxonomy employees choose from on each line item. Manage them at Expense Categories (/admin/expenses/categories) — this requires the HR/Finance permission.
Every new workspace starts with eight built-in categories:
- Travel
- Meals & Entertainment
- Office Supplies
- Software & Subscriptions
- Training & Conferences
- Communications
- Client Hospitality
- Other
To add your own, select New Category and give it a Name (required), an optional Icon (a Lucide icon name such as Plane), and an optional Description. You can edit a category at any time, and toggle Show inactive to view categories you have deactivated.
Category policy
Each category can carry a policy, set on the same form under Policy. Every limit is in the workspace currency and an empty field means no rule.
| Setting | What it does |
|---|---|
| Pricing | Amount typed by the claimant (the default), or Per unit (quantity × rate). A per-unit category takes a Unit (km, mile, day) and a Rate per unit; the claimant enters a quantity and the amount is worked out. Mileage and per-diem categories are the usual per-unit ones. The country pack's own mileage and per-diem rates are offered as one-click defaults; where the pack prices in another currency the form says so and you convert the rate yourself. |
| Max per item | The most one item may come to. Above it, the claim cannot be submitted. |
| Receipt required above | Above this, an item needs a receipt before the claim can be submitted. |
| Justification required above | Above this, an item needs a written justification before the claim can be submitted. |
The limits are read against the item's value in the workspace currency, so a foreign receipt is checked after conversion and a per-unit item after pricing. A breach warns on a draft, so the claimant can keep working, and refuses a submission, naming the category and the limit. The claimant's form shows the same advice as they type. The list page summarises each category's policy in one column.
A per-unit item keeps the rate it was saved with, so changing a category's rate later does not reprice old claims; a draft edited after the change is repriced at the new rate.
Company-card items and the card report
An item marked Company card was paid by the company, not the employee, so it is never reimbursed: the claim's reimbursable total leaves it out and the payroll adjustment on approval is for the reimbursable part only. The item still goes through the same approvals, because someone has to confirm the spending was needed and within policy.
Expense Claims › Company Card (/admin/expenses/company-card) lists every card item from approved, paid and closed claims, with the employee, department, claim, category, description, receipt and amount, filtered by date range and category, and Export CSV for matching against the card statement. The file is written in the language you are working in: its column headings, each claim's status and the yes or no under Receipt. Company-card spending is not in the payroll journal, since no money moves through payroll for it.
Foreign-currency items
A receipt in another currency is typed as paid, with its three-letter currency code and the exchange rate the claimant used (one unit of that currency in the workspace currency). The item is stored in both: the original amount and currency, and the converted amount, which is what the claim total, the policy limits and the payroll adjustment use. Per-unit categories are priced in the workspace currency only. Rates are entered by hand; there is no rate feed.
Because the rate is the claimant's own, it is shown to whoever reviews the claim: Team Expenses and the claim detail page put the amount as paid, its currency and the rate under the converted figure. A line is refused, on a draft as on a submission, when it gives a rate but no currency, when the rate is below 0.000001 or above 10,000,000, or when the amount (as typed or once converted) is more than 9,999,999,999,999.99. A line on a category priced by amount must give an amount, and one on a per-unit category a quantity.
Reading a receipt with AI
With an AI provider configured for the workspace (the same one the assistant uses), Read receipt on a line item with an uploaded image or PDF sends the receipt to the provider and fills the fields that are still empty: merchant and description, date, amount, currency, and the category matched by name against your list. The read is charged as AI credits and the result is advice for the claimant to check, never a submission. The provider does not keep the receipt. Files over 10 MB, and formats other than JPEG, PNG, GIF, WebP and PDF, are refused; without a provider the button reports that reading is unavailable. Only the claimant's own upload can be read: a file in the workspace's expense-receipts folder that is not attached to a colleague's claim. Any other path is answered as not found, and no credits are charged for it.
When you delete a category:
- If it is not used on any claim, it is removed.
- If it is used on existing claims, it is deactivated instead of deleted, so historical claims keep their category. Inactive categories no longer appear when employees create new claims.
Email notifications
The module sends automatic emails at each stage (using your workspace's email templates):
| When | Who is notified |
|---|---|
| A claim is submitted | The claimant's reporting manager, plus HR/Finance. |
| A manager approves a claim | HR/Finance. |
| HR approves a claim | The employee. The amount in this email is the reimbursable part of the claim, which is what payroll will pay; where part of the claim was on the company card, it adds that this part is not reimbursed. For a claim paid entirely on the card it says the claim was approved and that nothing is owed, with no amount and no payroll month. |
| A claim is rejected | The employee (with the rejection reason). |
Each email is sent once the change is saved, never before. On an approval flow of three or more steps, HR is told that the manager approved once, at the first step, not again at each later step.
Quick reference: where things live
| Page | Route | For |
|---|---|---|
| My Expenses | /portal/expenses | Employees — list of your claims. |
| New / Edit claim | /portal/expenses/new | Employees — create or edit a draft. |
| Team Expenses | /portal/team-expenses | Managers — approve direct reports' claims. |
| Expense Claims | /admin/expenses | HR / Finance — all claims, filter, export. |
| Expense Categories | /admin/expenses/categories | HR / Finance — manage categories and their policy. |
| Company Card | /admin/expenses/company-card | HR / Finance — card items from approved claims, with CSV. |
| Approvals | /portal/approvals | Everyone — the requests waiting on your decision, across modules, and the progress of your own. Open on a claim's card leads to the claim's page (/admin/expenses/:id) for an admin role with expenses.view_all, or to Team Expenses for the claimant's reporting manager with expenses.approve_team; anyone else decides on the card, which has no Open. Out-of-office delegation covers leave, expenses, shift swaps, leave allocations and timesheets, or all of them. |
| Approval flows | /admin/settings/approval-flows | Admins — who decides claims, in what order. |