Attendance
The Attendance area lets you see who was present each day, correct records, define working shifts, review employee requests, and pull punches from biometric devices. Everything below lives under Attendance and Biometric in the admin sidebar.
| Screen | Route | What it's for |
|---|---|---|
| Daily Attendance | /admin/attendance | View attendance by date or by employee/month |
| Mark Attendance | /admin/attendance/mark | Record or edit attendance by hand |
| Bulk Upload | /admin/attendance/upload | Import attendance from a CSV file |
| Attendance Logs | /admin/attendance/logs | Raw punch records (clock-in/out events) |
| Regularizations | /admin/attendance/regularizations | Approve employee correction requests |
| Overtime Requests | /admin/attendance/overtime | Approve overtime requests |
| Shifts | /admin/attendance/shifts | Working hours, weekly off, attendance mode |
| Roster | /admin/attendance/roster | Who works which shift on which day: the week grid, patterns, publishing, swaps and the scheduled-vs-actual report (plan feature Scheduling) |
| Attendance Settings | /admin/attendance/settings | Grace, lateness, overtime and reminder rules |
| Kiosks | /admin/attendance/kiosks | Tablets at the door: devices, their links and employee PINs (plan feature Scheduling) |
| Biometric Devices | /admin/biometric | Connect and manage ZKTeco devices |
Employees see their own attendance and file correction requests from their portal at
/portal/attendance, and their published shifts at /portal/schedule.
Daily attendance
Open Daily Attendance to see one row per employee for a chosen date. Use the Today / Yesterday chips, the day stepper, or the calendar to move around, and filter by Department. Summary cards at the top count Total, Present, Absent, Late and On Leave.
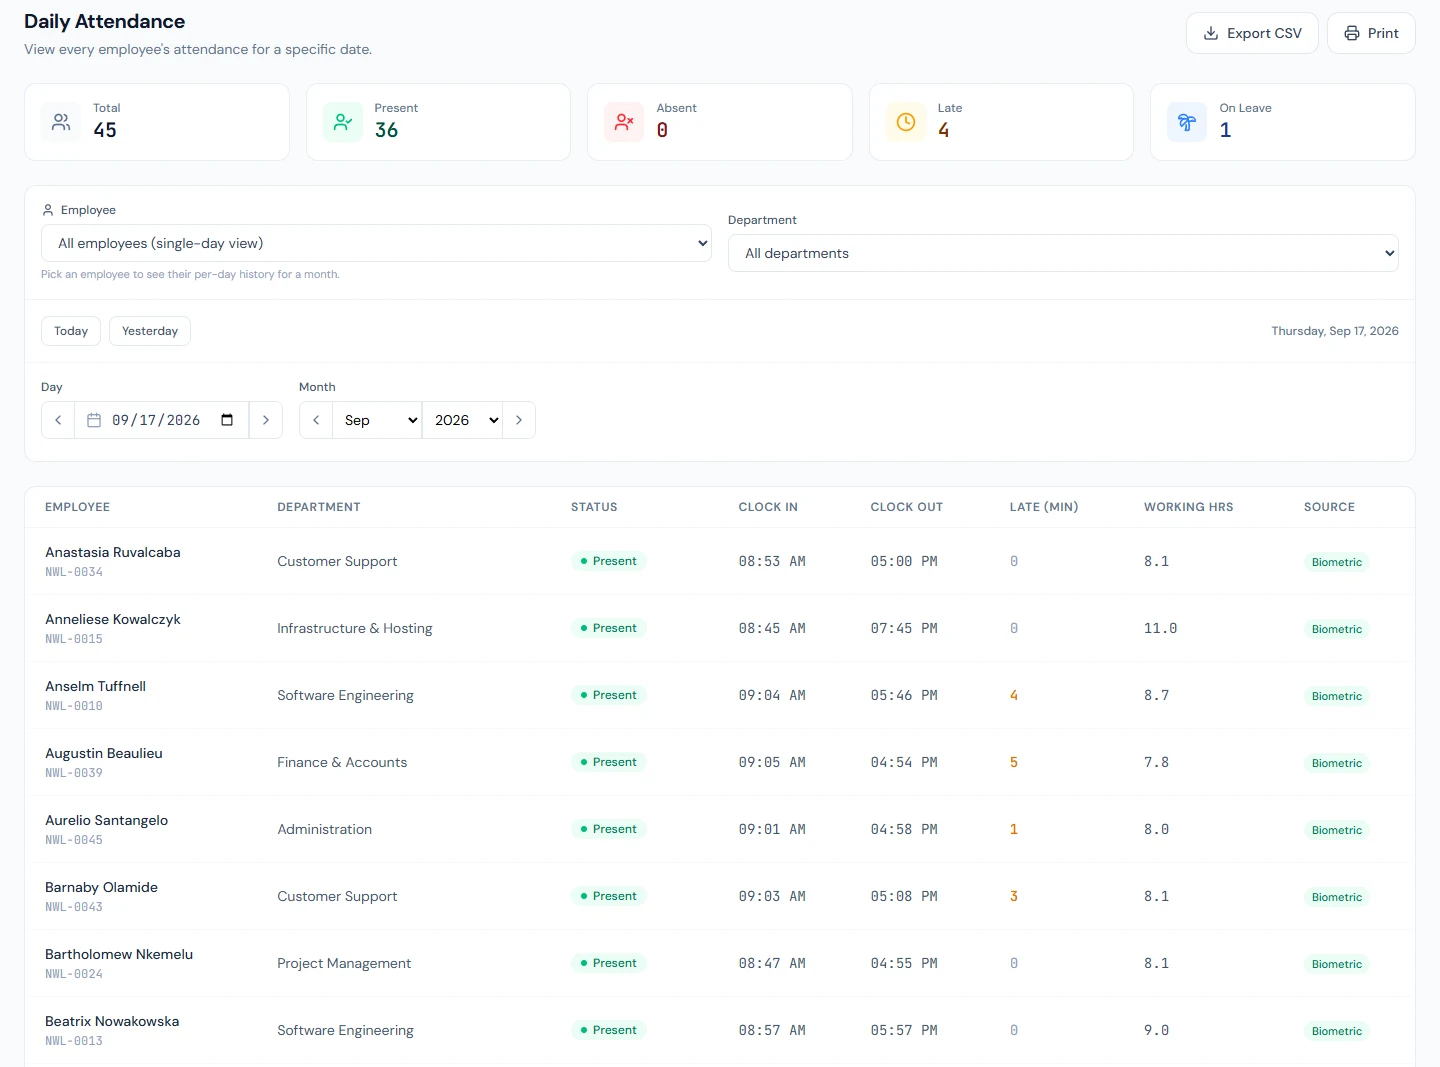
Each row shows the status, clock-in, clock-out, late minutes, working hours and the source of the record (Auto, Biometric, Manual or Import). Days that were worked on a holiday or weekend are highlighted in amber so you can spot overtime-eligible work at a glance.
To see one person's whole month, pick an employee from the Employee dropdown — the page switches to a per-day monthly view with its own summary (present, absent, late, leave days and total hours). Use Export CSV to download the current view or Print for a paper attendance register.
A day where someone punched in but never punched out is tagged Missing Clock-out (once the shift-end plus checkout-grace window has passed). This is only a flag for follow-up — it does not change the day's status or reduce pay. Fix it by filing a regularization.
Marking attendance by hand
Mark Attendance works in two modes:
- Daily mode (default) — every employee for a single date. Set each person's status, clock-in and clock-out, add an optional remark, then Submit Attendance, which writes only the rows you changed (the button shows how many); a row you did not touch keeps its source, so a terminal punch stays Biometric. Mark All Present marks everyone who is not already Present or on leave, with each person's own shift hours where no time is entered.
- Monthly mode — pick an employee to edit their full month. Each day is an editable row; changed rows are highlighted and Save only writes the days you touched. Mark All Working Days Present fills in every working day that is not already Present, on leave, a weekend or a holiday, with the shift's hours for that day.
Available statuses include Present, Absent, Half Day, Late, Early Leave, On Leave, Holiday, Weekend, Work From Home and Comp Off.
The Force (override) lock
In monthly mode each row has a Force checkbox. Normally the clock-in time drives the status — an on-time punch becomes Present, a late one becomes Late/Half-day/Absent, and the system may recompute this in the background. Tick Force to pin the exact status you chose while keeping the real punch times on record. Typical uses:
- Keep an employee Present even though they clocked in two hours late.
- Mark someone Absent for policy reasons even though a punch exists.
If the times themselves are wrong (for example a bogus auto-present time), clear the punch with the small ✕ next to the time field instead of using Force.
Rest-day swaps
In monthly mode, Swap Rest Day records that an employee worked a weekly-off or holiday and takes their rest on a different day instead. The worked day is paid as a normal day and the substitute day shows as the rest day; both are tagged with a Swap marker wherever attendance is displayed.
Shifts
A shift defines working hours and the rules that turn punches into attendance. Open Shifts to add or edit them. Each shift has:
- Start / End time, Break (min) and Grace (min) — the minutes after the start before a punch counts as late; a shift's grace overrides the company-wide one.
- Weekly Off days (tap the day chips).
- Attendance Mode (see below).
- Attendance affects salary — on by default. Turn it off for directors or fixed-retainer staff so absences, half-days and lates never reduce pay (leave balances are still deducted normally). A shift with this off shows a Fixed Pay tag.
- Default Leave Group inherited by employees on the shift.
- Default shift — the shift assigned automatically to every new employee created without an explicit shift (including bulk-imported ones), so nobody ends up with no working pattern. An employee with no shift is never auto-marked present — payroll would read their whole month as absence and deduct nearly the entire salary — so payroll approval is blocked while the workspace has no default shift or while any employee has none (see pre-flight checks). Keep exactly one shift flagged as the default: flagging several makes it undefined which one a new employee inherits, and payroll pre-flight warns about it. New workspaces come seeded with a generic Office Shift (09:00–17:00, auto-present, Sat/Sun off) already flagged as the default.
Attendance modes
The mode decides how a working day is treated when there is no punch.
| Mode | Behaviour |
|---|---|
| Punch Required | Biometric/manual in-out is enforced. A working day with no punch becomes Absent. |
| Auto-Present | For residential or trusted staff. A background job marks working days Present; HR can still override any day by hand. |
| Punch Not Required | Exempt staff. No attendance rows are written on working days, biometric punches are ignored, and the employee is paid in full. |
Punches from a biometric machine or GPS only decide attendance on Punch Required shifts. How attendance is captured lists any auto-present shifts and can switch them to Punch Required after you confirm.
The Auto-Present job marks the employees who are assigned to an auto-present shift, each night for the day that has just ended at their office. Being the workspace's default shift does not make it mark anyone: someone with no shift assignment is not marked, so give them one. Where a published roster entry or a pattern covers a day, that decides instead: the person is marked if it puts them on an auto-present shift, and not on a rostered day off or a day rostered onto another shift.
Punch Not Required always behaves as a fixed-pay shift — the Attendance affects salary toggle is locked off for it. Choose a different mode if you need attendance to influence pay.
Exempt days appear as Exempt in attendance views, and monthly summaries count exempt days separately from present/absent totals. Because exempt staff never produce attendance rows by design, the payroll pre-flight check that demands attendance before approval skips employees on Punch Not Required shifts — an exempt shift never blocks payroll.
Two more fields matter once a workspace rosters: Crosses midnight says the shift ends on the next calendar day, so a punch after midnight but before the end time counts for the day the shift started (a 22:00–06:00 night shift in Dubai lands both punches on one date); and a Colour tints the shift's chips on the roster grid and in each employee's My Schedule. A shift whose end time is at or before its start time crosses midnight whether or not the box is ticked, and is saved that way; tick it yourself only for a shift whose times do not show it.
Roster
The roster is part of the Scheduling feature (scheduling), which comes with the
Growth and Enterprise plans. Without it the menu entry shows a
lock, and the locked page names the plans that include it; shifts, assignments and the default shift keep
working as before.
A shift says what a normal day looks like; the Roster (/admin/attendance/roster)
says who works which shift on which day. Every attendance screen, the nightly auto-present
job, the missing-punch reminders, biometric attribution and payroll read the day's shift
through one resolver, in this order: a published roster entry, else the employee's
pattern, else their shift assignment, else the workspace default shift. A
workspace that never opens the roster sees no change.
The week grid
One row per active employee, Monday to Sunday, with the department and branch filters and a search box. Each cell shows the day's shift as a coloured chip, or Off:
- a solid chip is published, and what the employee sees as final;
- a dashed chip is a draft — planned, not yet published;
- a faded chip is a standing shift (an assignment or the default) that the roster has not overridden, with the source in the tooltip;
- a small arrow marks a day that changed hands through a swap, a note icon a planner's note.
Hours per row and per day are totalled from each shift's span less its break, in the employee's branch timezone. Clicking a cell opens the editor: pick a shift, plan a day off, add a note the employee sees once published, or Clear entry so the pattern, assignment or default decides again. Saving writes a draft on an empty day or over a draft. On a day that is already published, an edit (or Clear entry) waits beside it as a change for the next publish: the cell shows an amber dot and outline, its tooltip names what is live until then, and the employee, attendance and payroll keep the published shift. Publishing puts the change live and emails the employee; Undo the change in the cell drops it. Copy previous week copies last week's entries into this week as drafts, and stages the copy the same way on days already published; the notice says how many.
Patterns
A pattern repeats a cycle of shifts and days off: five days on and two off, four on and four off, a fortnight that alternates Early and Late. Build one on the Patterns tab (name, cycle length, a shift or Off for each day of the cycle; Fill weekdays with… sets a Monday-to-Friday pattern in one go), then Assign people to it from a date, with a Day 1 on anchor so two people can run the same rotation offset from each other. A nightly job expands assignments eight weeks ahead into draft entries and never touches a day the planner already edited; assigning materialises the weeks straight away. Deactivating a pattern stops new drafts; entries already made stay.
Publishing
Publish checks every draft in the week against the workspace's scheduling rules and shows what it found before anything changes: how many drafts, and each warning with the person, the day and the figure:
| Rule | Warns when | Default |
|---|---|---|
| Minimum rest between shifts | fewer hours than the limit between one shift's end and the next's start | from the country pack (11 h in the EU and the UK, none in the US) |
| Maximum hours per week | more paid hours Monday to Sunday than the limit | from the country pack (48 h in most of Asia and Europe, 38 h in Australia) |
| Maximum consecutive days | more working days in a row than the limit | from the country pack (6 in most packs) |
| Publishing notice | the week is published fewer days ahead than the limit | workspace setting, none by default |
The checks read past the edges of the week being published. Working days before and after it count towards a run of consecutive days, so a seventh day in a row warns even when the first six were published last week; and a range that covers part of a week is still added up over its whole Monday-to-Sunday week. The dialog covers everyone you may roster, whatever the grid is filtered to, and names each person.
Tick Publish anyway and give a reason to override. The reason is recorded in the audit
log and sent with the roster.published webhook; the warnings themselves are kept on the
published entries. Publishing emails each affected employee (Schedule Published), fires
the roster.published webhook, and announces the dates and headcount in a connected chat
channel. Unpublish returns a week to draft. The Rules tab shows the country
default, the workspace override and what is in effect for each rule, plus Warn on
overtime: it is on by default, and switching it off stops a week over Maximum hours
per week being flagged at all. The limit stays where it is and the other three rules are
not affected.
Swaps and drops
From My Schedule an employee offers a published shift to a named colleague (Swap,
optionally taking one of theirs in return: on another day, or on the same day, which
exchanges the two shifts) or gives it up for anyone to pick up (Drop). An open drop
shows to everyone in the workspace, and taking it is refused for someone who already has
a shift that day. The colleague accepts or declines; an accepted request then enters the
approvals engine under the Shift swaps default flow — the requester's reporting
manager, else anyone with roster.publish — and shows in the approvers' Portal → Approvals
inbox and on the roster's Swaps & drops tab. Approval rewrites both employees'
published days (source swap) and fires roster.swap.approved; rejection leaves the
roster as it was. A request can be cancelled by the requester while it is open.
An accepted request is never applied without someone deciding it. In a workspace with no
approval flow for shift swaps it waits, as Awaiting approval, on the Swaps &
drops tab until someone with roster.publish approves or rejects it there; a planner
who sees only their direct reports decides only their requests. Once a request has been
decided, cancelled or declined, a second decision is refused, so two people acting on the
same request at the same moment cannot both take effect.
A request is only good until its day. Once a day of it is over on the clock of the person who works that day (their branch's, else the workspace's), it can no longer be accepted or approved: it becomes Expired, and leaves the approvers' inbox. A day that two people have already worked is never rewritten by a late approval. Requests nobody touches are expired within the hour; one that someone tries to accept or approve is expired there and then, and they are told why. A late reject is still recorded as a reject. An employee has one open request per day: a second one for the same day is refused until the first is decided, withdrawn or expired.
Scheduled vs actual
The Scheduled vs actual tab lists, per employee and department over a date range, scheduled days and hours, worked days and hours, late and early-out minutes, overtime, no-shows (a scheduled day that passed with no work and no leave, holiday or swapped rest day to excuse it) and unscheduled work (a day with punches the roster had off), with a CSV export. A no-show is what the day already reads as — Absent — on Daily Attendance.
Calendars and the API
Employees can subscribe to their own shifts from My Account → Calendar (My shifts),
a connected Google or Outlook calendar gets a second Team schedule calendar beside
Team leave (Integrations),
and the public API serves roster_entries read-only on the attendance:read scope.
Regularizations
When an employee's record is wrong (missed punch, working from a client site, etc.) they file a regularization request from their portal Attendance page. Requests land on the Regularizations screen for review.
Each row shows the date, the current status and times, the requested status and times, and the employee's reason (click the eye icon to read a long reason in full). Filter by All, Pending, Approved or Rejected, then Approve or Reject. Approving writes the requested status/times onto the day; these human-approved records are protected and will not be overwritten by later biometric syncs.
A regularization cannot be filed for a day on a Punch Not Required shift, where there is no punch to correct. That means a shift the employee is assigned to, or one the roster or a pattern puts them on that day; the workspace's default shift does not count, so someone with no assignment can always file one.
You can't approve or reject your own regularization or overtime request while another approver can decide it. In a workspace with only one approver, that person can still decide their own.
Overtime requests
The Overtime Requests screen lists extra-hours requests with the employee, date, hours and reason. Filter and Approve / Reject the same way as regularizations. Employees file them from My Attendance in the portal (Request Overtime: the date, the hours in quarter hours, an optional reason), one open request per day.
Both screens show a reviewer only the requests they can decide. Someone who also has
attendance.view_all (HR and admins) sees every request in the workspace. Someone who can
approve but not view all attendance (the Department Head role, for example) sees,
approves and rejects only the requests of the employees who report to them.
How overtime is credited is controlled in Attendance Settings → Overtime:
- Require OT Approval — when on, overtime hours are credited only for approved requests; unapproved extra hours are recorded but not credited.
- Auto-Approve OT Requests — auto-approves submitted requests while keeping an audit trail.
- Minimum Overtime (minutes) — how long past shift end counts as overtime.
- Overtime Rate Multiplier — the rate overtime is paid at where your country's labour law sets none of its own: overtime beyond the shift, and work on a rest day or holiday. Where the law sets a rate (Pakistan's double time, the US time and a half beyond forty hours a week, the UAE's 1.25), payroll applies that rate instead. Overtime is paid through the OVERTIME salary component once a salary structure carries it; until then the hours are shown on the slip and not paid. See Overtime pay.
- Rounding increment and Rounding direction — punch rounding. Every clock-in and clock-out is rounded to the increment (5, 6, 10, 15 or 30 minutes; Exact keeps the minute) before lateness, hours and overtime are measured. Nearest at 15 minutes is the common seven-minute rule; Up and Down always round that way. The rule is the same however the punch arrives: a device, the kiosk, the GPS button, a mark by hand or an import. The punch itself is kept as it happened; only the grading reads it rounded. Off by default, so nothing changes until you choose it.
- Approved overtime becomes — Pay (the default) prices the credited hours on the slip as above. Time off (bank) converts each approved request into days of the Compensatory Off leave type instead: the hours divided by the length of the employee's shift on the day worked, to a tenth of a day, added to their allocation for the current fiscal year the moment the request is approved. The employee spends them as ordinary leave, and payroll does not price the hours that were banked (they still show on the slip as a count). Banking needs Require OT Approval on, because the approval is what credits the bank, and it is greyed out where the country's statute pays overtime (the United States and the Philippines). The portal shows the days held beside the month's overtime hours. See Banked overtime.
Bulk upload
To import many records at once, use Bulk Upload. Download the template, fill it in and drop the file back. The CSV columns are:
employeeCode,date,status,clockIn,clockOut
EMP001,2024-01-15,present,09:00,18:00
EMP002,2024-01-15,absent,,
EMP003,2024-01-15,half_day,09:00,13:00
Status values are present, absent, half_day, late or work_from_home. Times are
HH:MM (24-hour) and dates are YYYY-MM-DD. Imported rows show a source of Import.
Attendance logs
Attendance Logs shows the raw punch stream — every clock-in and clock-out event with its time, type, source, device and IP address. Filter with the date presets (Today, This week, This month, and so on), the month stepper, or by employee. This is the audit trail behind the processed attendance you see on the other screens.
A GPS punch that was saved on a phone with no network and sent later is listed with the source Offline replay, at the time it was pressed; the time it reached the server is kept with it (see Offline punches).
Attendance settings
How attendance is captured
The first card on Attendance Settings records how your team clocks in. Tick every method you use — you can combine them:
| Method | Needs | Plan |
|---|---|---|
| Biometric machine | At least one active device (see Biometric devices) | Biometric devices |
| GPS attendance | GPS attendance switched on, a site, and employees assigned to it (see Geo attendance) | GPS attendance |
| HR marks attendance | Nothing | Every plan |
Each chosen method shows Set up and ready or the steps still missing, with a link to each. A method your plan doesn't include is shown locked. This choice drives the Choose how attendance is captured step on the dashboard checklist, which stays open until every chosen method is ready.
If any shift is auto-present, the card points out that punches won't decide attendance on it and offers Require punches, which switches those shifts to Punch Required after you confirm. Days already recorded are not changed; from then on a working day without a punch counts as absent.
Rules
Attendance Settings also holds the company-wide rules. Shift times are wall-clock times in the employee's own zone: the branch's timezone when the branch has one (see Branches), otherwise the workspace's. A 09:00 shift in a Denver office is late at 09:11 Mountain time, not Central.
- Grace Period — minutes after shift start before a late mark.
- Checkout Grace — how long after shift end a punch-out still counts; beyond it the day is flagged as missing a check-out.
- Late Thresholds 1–3 — a day is Late from the first minute past grace. Thresholds 2 and 3 carry a minute value and an action (Mark as Half Day or Mark as Absent) that changes the day's status once the lateness, or the early leaving, passes them. Threshold 1 and the Warning action change nothing automatically; they are printed in the employment agreement's attendance clause.
- Lates per month for Absent — how many lates in a month equal one absent.
- Missing Punch Reminders — email employees who forget to check in or out, after a configurable offset. Holidays, weekly offs, approved leaves and trust-based shifts are skipped. Leave taken by the hour is not a day of leave: the employee still works the rest of the day, so they are still reminded, and the day is still graded by its punches (with none, it is Absent, not On Leave).
- Auto check-out — close a day that has a clock-in and no clock-out, this many minutes
after the shift ends (120 by default once switched on; up to 720). The day is closed at
the shift's end time, not at the moment the job runs, and graded as a punch there would
be: no overtime, no early leaving, the hours up to the shift end. The remark
auto_checkoutis added so Attendance Logs and the record show it was the system, not the employee. A day HR has locked with Force, or one set by a regularization, is never touched; an employee who really worked late files a regularization as before. The same job that sends the reminders does the closing, so it reaches a day within fifteen minutes of the delay passing. If the employee's own clock-out turns up afterwards (a device that synced late, a punch inside the checkout window), it replaces the system's and the remark is removed. - Working Days — working days per week and which days are weekly offs.
Biometric devices (ZKTeco)
The Biometric Devices screen connects ZKTeco fingerprint/face terminals so punches flow into attendance automatically.
Adding a device
Click Add Device and the wizard first probes the connection, then collects the details:
- Host and Port (ZKTeco default
4370), Connection type (TCP/UDP) and Comm key if the device uses one. - Timezone and optional Area.
- Auto-sync on/off and its interval in minutes, so punches are pulled on a schedule.
Use Test Connection on any device to confirm it is reachable.
Syncing punches and users
From a device you can:
- Fetch Attendance — pull the latest punches into the workspace. Punches are merged into attendance without overwriting human-approved records (regularizations, leave, holidays).
- Fetch Users — pull the device's user list so you can map each device user to an employee (bind). Unmapped punches stay visible until they are bound.
- Sync Fingerprints — pull enrolled fingerprint templates into the employee library.
- Push Employees — send selected employees down to the device.
Punches pulled from devices appear on the Biometric Punches page (/admin/biometric/punches)
and can be exported to CSV. Per-device Sync History, a Command Log, Device Controls
(enable/disable, restart, power-off, clear data, network/time settings) and Backups
(create and restore device data) are available from each device's pages.
Geo attendance (GPS clock in/out)
Geo attendance is an Enterprise feature. On other plans the menu entries appear locked.
Employees can clock in and out from the employee portal when they are physically at a company site. The check runs on the server: the browser only reports the phone's or laptop's coordinates, and the workspace decides whether they are close enough.
Turn it on under Attendance Settings → Geo Attendance. Three settings live there:
- Enable Geo Attendance — the master switch, off until you turn it on.
- Max GPS Accuracy (meters) — punches whose reported accuracy is worse than this are refused. The default of 100 m keeps out coarse wifi- or IP-based location guesses that could otherwise place someone inside a site they are nowhere near.
- Accept offline punches — off until you turn it on. See Offline punches.
Setting up locations
Geo Locations (/admin/attendance/geo-locations) is where you define the sites:
- Name, Latitude and Longitude. Stand at the site and press Use my current location to fill the coordinates from your own device, or paste them from a map. View on map opens the point in Google Maps so you can sanity-check it.
- Radius (m) — how far from that point still counts, from 10 m up to 10 km. A small office might use 100 m; a factory compound, warehouse yard or event venue needs more. The radius is per location, so each site can differ.
- Branch — optional link to a company branch, for reporting.
- Status — set a location to Inactive to pause it without deleting its history.
Assigning employees
Defining a site does not by itself let anyone punch from it. Open Assignments on a location and select the employees who may use it. Only assigned employees can clock in there, and only at the locations they are assigned to. Saving replaces the whole list, so unticking someone removes their access.
Reviewing attempts
Geo Punch Attempts (/admin/attendance/geo-attempts) records every attempt, the
successful ones and the refused ones, with the employee, time, the nearest site, how far
away they were, the accuracy their device reported, and the coordinates. When an employee
says "it won't let me clock in", the reason is on this page. Refusals are one of:
| Reason | What happened |
|---|---|
| Geo attendance disabled | The company switch is off. |
| Not assigned to any site | Nobody has assigned them to a location yet. |
| GPS accuracy too low | Their device's fix was vaguer than the configured maximum. |
| Outside site radius | They were too far away; the message tells them the site and distance. |
| Punch-exempt shift | Their shift is Punch Not Required on that date. |
| Day finalized by HR | The day was regularized or force-set, so a punch cannot change it. |
| Checkout window closed | Too long after shift end — they should file a regularization. |
| Already recorded | The day already had a record the punch could not change. |
| Offline punches not accepted | A punch saved offline arrived, and the workspace does not accept them. |
| Captured too long ago | A punch saved offline waited more than two days, or claims a time after it was sent. |
| Earlier than a recorded punch | A punch saved offline was pressed before a punch already on that day. |
Accepted geo punches become ordinary attendance: the same late grading, overtime and shift rules as a biometric punch, recorded with a source of "geo". Days that HR has already regularized or force-set are never overwritten.
Offline punches
A phone with no signal cannot reach the server, so by default a punch pressed there fails and the employee tries again once they have a connection. Switch on Accept offline punches if your people clock in where there is no signal (a basement, a remote site). The portal then saves the punch on the phone, with the position and the moment the phone measured, and sends it when the network is back.
A saved punch is recorded at the time it was pressed, not the time it arrived. That time comes from the phone: the server takes how long ago the phone says the button was pressed and counts back from its own clock, so a phone that runs a few minutes fast or slow makes no difference, but someone who sets their phone's clock on purpose can move the punch. Lateness and the checkout window are judged on that time. That is what this setting trusts, and why it is off until you choose it.
What limits it:
- Every check a live punch passes still applies: an assigned site, the radius, the GPS accuracy, the shift, a day HR has not finalised.
- A punch that waited more than two days is refused.
- A punch pressed before one already recorded for that day is refused, so a late arrival can never be written as a clock-out before the clock-in.
- The same saved punch is never recorded twice, however many times the phone sends it.
- A phone only sends the punches of the person signed in, for the workspace they are signed in to.
Each one is marked Offline replay on Daily Attendance and in Attendance Logs, and every attempt, accepted or refused, is on Geo Punch Attempts like any other.
What employees see
On My Attendance in the portal, assigned employees get a Clock In / Clock Out button. Their browser asks permission to use their location the first time. The button knows which action is next, so they cannot clock in twice. If they are out of range the message names the site and how far away they are.
Kiosks
Kiosks are part of the Scheduling feature, which comes with the Growth and Enterprise plans. Without it the menu entry is locked and a kiosk link answers Kiosks are not switched on for this workspace.
A kiosk is a tablet or any browser at the door. Employees identify themselves with a PIN or by scanning their badge and the punch lands in Attendance Logs with source Kiosk, graded by the shift and the rules like a terminal punch. Nobody signs in on the tablet. The device holds a link with a long secret token, and the first device to open the link is set up as the kiosk: from then on the link works on that device and nowhere else.
Attendance → Kiosks lists the workspace's devices. Add kiosk asks for:
- Name — Front desk, Warehouse gate.
- Branch — optional. A device at a branch lists only that branch's people and shows that branch's clock; with no branch it lists everyone and runs on the workspace's clock.
- How people identify themselves — PIN, Badge or PIN or badge. A PIN device lists the people who have a PIN (by photo, or by initials where there is none) and asks for the PIN after a tap on the name; a badge device waits for a scan and lists nobody.
- Take a photo on every punch — when on, the tablet's camera takes a picture at each punch and
stores it beside the log row (Attendance Logs shows a thumbnail). The camera needs a
secure (
https://) address and the browser's permission the first time. With it on, a punch without a photo is refused, so a tablet whose camera is missing or blocked records nothing until the camera works. The photos are private: only someone who can open Attendance Logs sees them.
Saving adds the kiosk to the list with its link and Copy link. Open the link on the tablet and choose Use this device as the kiosk. That sets the kiosk up on that tablet, and the link then works there only: someone who reads the address off the screen and opens it on a phone is told the kiosk is set up on another device. Put the browser in full-screen or kiosk mode and leave it. The browser has to keep its site data, so do not use a private window.
For each kiosk the list shows whether it is set up on a device and since when, and when that device last called in.
- New link issues a new link. The old one stops working at once, and the new one has to be opened and set up on the tablet again. Do this when a tablet is lost, when the link may have been seen by someone it was not meant for, or to move the kiosk to another tablet.
- Release tablet keeps the link and lets go of the device, so the next device to open the link can be set up as the kiosk. Use it when the tablet's browser data was cleared and the tablet says the kiosk is set up on another device.
- Deactivate keeps the kiosk but refuses punches; Delete removes it.
PINs
A PIN is four to eight digits, set per employee. Employees set their own under My Account → Sign-in & Security → Kiosk PIN; the PINs panel on the Kiosks page shows who has one, and lets HR assign or clear a PIN for someone who cannot. PINs are stored hashed, like passwords, and are shown to nobody, HR included.
Wrong tries are limited in two ways:
- Five wrong PINs for one person lock PIN entry for that person on that kiosk. The first lock of a day lasts ten minutes, the second an hour, and a third lasts until the next day begins on the kiosk's clock. Other kiosks are not affected, tapping while locked does not lengthen a lock, and entering the right PIN in between does not reset the day's count: at most fifteen wrong PINs can be tried against one person on one kiosk in a day.
- Twenty failed tries on one kiosk in ten minutes, for whoever and of whatever kind (wrong PINs, unknown badges), lock that kiosk for up to ten minutes. This is what stops one PIN being tried against every name on the list.
A valid ID card still works whatever is locked, the person's own PIN included. A new PIN lifts that person's lock at once, whether HR assigns it or they set it themselves under My Account; it does not start the day's count again.
When a person is locked for the second time in a day (the hour-long lock), everyone who
holds attendance.kiosk_manage is told, in the bell and by the Kiosk PIN Entry Locked
email, which kiosk it was and who. It is sent once per person per day, whichever kiosk
locked them. Two locks in a day mean either someone who has forgotten their PIN or
someone guessing at a colleague's: assign a new PIN from the PINs panel, and look at
the punch photos if the kiosk takes them. The email can be switched off under
Settings › Email Templates, and the bell entry with the Attendance notifications.
Badges
A badge scan reads the ID card Brand Studio prints (ID cards): the card's QR code carries its verification link, and the kiosk resolves it to the employee. A scanner that types the code and presses Enter works as is; a card from another workspace, or one that was revoked, replaced or has expired, is refused with That badge is not recognised.
Anything else a scanner reads, such as an employee code printed as a barcode, only says who the person is. The tablet then asks for their PIN, and the punch needs both. It asks for the PIN whatever was scanned and refuses a wrong code in the same words as a wrong PIN, so the kiosk cannot be used to find out which employee codes exist. A Badge kiosk takes no PINs, so only ID cards work on it.
What a punch does
The kiosk works out the direction itself: the first punch of the day is a check-in, the next a check-out. A second tap by the same person on the same kiosk within a minute records nothing: the screen shows the first punch again. It refuses, with the reason on screen, a person on a Punch Not Required shift, a day HR has locked or set by a regularization, a second check-in, a check-out with no check-in, and a check-out after the checkout window closed. The last three are still written to Attendance Logs as punches that changed nothing, and on a kiosk that takes photos each keeps its photo. Everything else follows the capture rules in Attendance settings: grace, lateness, rounding and the checkout window. The device never shows anyone's hours or history.
Banked overtime
With Approved overtime becomes set to Time off (bank), approving an overtime
request credits the employee's Compensatory Off balance instead of money. Every
country's leave set carries the type (code CO, paid, on demand, nothing granted
upfront); a workspace created before it existed gets one the first time banking is
switched on. A leave type of your own that already uses the code CO is left exactly
as it is and is never credited: the type that holds banked overtime is then created
beside it with the code COMP, and named Compensatory Off (banked overtime) if
yours has the plain name too. The credit is the request's hours divided by the shift length on the day
worked, to a tenth of a day (the precision a leave balance holds), into the current
fiscal year's allocation, so an eight-hour shift banks a four-hour request as half a
day. The employee sees the days on My Leaves as any other balance and applies for
them the same way; HR sees them under Leave → Balances.
The request and the credit are one step. If the credit cannot be made (no fiscal year is open, or the hours are too few to round to a tenth of a day), the approval is refused with the reason and the request stays pending; and when two people approve the same request at the same moment, one approval goes through and the other is told it was already decided, so the balance is credited once.
Each request keeps what its approval did with the hours: paid, or banked and how many days. Changing Approved overtime becomes later does not alter a request already approved or the days already credited, and payroll follows the request, not the setting. The hours of a request approved to be paid are priced on the slip as overtime always is; the hours of a request that was banked are not priced (they still show as a count); and both hold whatever the setting says on the day the run is processed. So the setting can be changed in the middle of a payroll month: overtime approved before the switch is still paid, overtime banked before a switch back is not paid as well, and no hour is lost or settled twice. Expiry and carry forward follow the Compensatory Off policy, which a workspace may edit like any other (Leave).
Who can do what
Attendance and biometric actions are gated by permissions:
attendance.view_all— view all attendance, logs, settings and geo punch attempts.attendance.mark— mark and edit attendance (and rest-day swaps).attendance.bulk_mark— bulk mark / CSV upload.attendance.regularize_approve— review and approve regularizations (only their direct reports' withoutattendance.view_all).attendance.overtime_approve— review and approve overtime (only their direct reports' withoutattendance.view_all).attendance.geo_manage— create geo locations and assign employees to them.attendance.kiosk_manage— add, rotate and remove kiosk devices and assign or clear employees' kiosk PINs.company.settings— change attendance settings, including how attendance is captured.attendance.manage— create and edit shifts, including Require punches on the capture card.roster.view— open the roster, patterns, rules, swaps and the scheduled-vs-actual report (direct reports only withoutattendance.view_all);roster.manage— edit cells, patterns, assignments and rules;roster.publish— publish, unpublish and decide swaps.biometric.viewandbiometric.manage— view or manage devices.
Employees need no extra permission to clock in — being assigned to a location is what grants it.
Employees use attendance.view_own and attendance.regularize_request to see their own
records and file correction requests from the portal, roster.view_own to see My Schedule
and roster.swap_request to offer, take, accept or decline swaps and drops.